Showing posts with label halloween. Show all posts

Friday, October 31, 2014

HALLOWEEK DAY #5 - HAPPY HALLOWEEN!

pumpkin-carving

The instant Alex arrived home from work on Monday we wolfed down our tea and got started on our Pumpkins ready for Halloweek. Its become quite a yearly tradition for us to have a little Pumping carving competition, I had been secretly researching my chosen face for months now (little to Alex's knowledge) as he is really quite artistic and wins every year. This year I had it in the bag, surely...

With newspaper laid and our carving weapons of choice in hand, we laughed as pumpkin seeds bounced off the walls and our little pumpkins faces slowly came to life. I went for a feline style for my face, Alex a smirking zombie. After removing sticky seeds from the kitchen and washing up the evidence, we popped in tealights and admired our handiwork.

I think it was a draw this year, (I'll have him next year!) Right now our pumpkins are in pride of place shining out on our balcony. With tea lights flickering and dancing inside illuminating  their cheeky pumpkin faces and giving off a faint scent of roasted pumpkin, it truly feels like Halloween.

I've really enjoyed doing 'Halloweek' this year - I hope you enjoyed the posts?

Happy Halloween!

5 Fandom Friday: The Halloween Candy I Always Hope For


Happy Halloween!!
Also, it's time for 5 Fandom Friday! This week's topic: The Halloween Candy I Always Hope For When Trick-Or-Treating!

(in no particular order)

1. Reese's Peanut Butter Cups
I say in no particular order, but these would probably top the list. I just love how perfectly the peanut butter and chocolate go together and that slightly salty taste to balance out all the sweetness. 

2. Almond Joy 
I LOVE coconut anything and these were my dad's favorite candy so I always hoped for lots of Almond Joys while trick-or-treating so the two of us could share ^^ Funny enough, however, I actually didn't like the almonds and would always eat around it so Mounds would've been better for me but because of my dad, I have a weird bias for Almond Joy.

3. Airhead Xtreme 
I loved Airheads as a kid and my all-time favorite were the sour rainbow strips. Just thinking about them makes my mouth water. 

4. Sour Patch
I love how these are both sour and sweet! They also taste great whether they're fresh and soft or a little older and hard which is ideal when you have a lot of Halloween candy to go through.

5. 3 Musketeers
Love the fluffy inside! Some chocolate bars can be a little TOO intense and rich for my taste with all they've got going on inside so I liked these because they just felt lighter while still being so good.

Honorable Mentions: Kit Kats, War Heads, and Twix

I hope you all have a fun and safe Halloween and get all the Halloween candy you always hope for! 

What's your favorite candy?

Wednesday, October 29, 2014

HALLOWEEK DAY #3 HALLOWEEN PUMPKIN NAILS

 photo pumpkin-nail-tutorial_zpsbcb5085c.jpg


For the past two years I've created a Halloween nail art design. This year, I've been loving decorating my home with little pumpkins and drinking pumpkin spice hot chocolates so much that I decided to create a little pumpkin nail art tutorial. I thought that I would have a go at dabbling in the world of youtube and make a video tutorial this year. I'm still getting used to the filming and editing but I really hope you like it!

Products used: 

Nails Inc Savile Row Nail polish
Soigne Permission Nail Polish
Sally Hansen Haute Chocolate Nail polish
Max Factor Cactus Green Nail Polish
Sally Hansen Insta Dri Top coat
Nail Dotting Tool

What do you think of these pumpkin nails?

Tuesday, October 28, 2014

HALLOWEEK DAY #2 MERMAID MAKE UP

halloweem-mermaid-makeup
halloween-mermaid-makeup
mermaid-makeup

My 'I am Mermaid' make up post is probably my most viewed post on my blog. I created the look over three years ago now, I've always been unhappy with the way that the post looked and so I thought it was about time to revisit it! This is a really easy and effective way to create a halloween mermaid make up look, the photo's don't quite pick up how pretty it looks, it's so simple but looks like it could have taken hours! This time, I wanted the scales to blend in a little bit more and to look almost like skin whilst still having a pretty aquatic mermaid feel.

I kept my base make up pretty simple, foundation, a hint of pink blusher and Revlon Sweet Tart lip butter on the lips with a small amount of iridescent glitter dabbed in the centre.

For the scales - You can cut out a square of fishnet tights and then pin it into your hair and over the areas that you want to create the scales on but I find it so much quicker and easier to just pop the tights over your head and pin the back so that you can then just dab the pigments easily where you want the scales. Using a big powder brush I started with collection dazzle me eye dust in Spellbound and pressed and swept the pigment over the fishnets roughly where I would normally contour - the hollows of my cheeks and high on  the temples, forehead and into the hairline. I then used Barry M dazzle dust in purple and overlapped the blue slightly and blended down onto my forehead and up onto my cheeks, I repeated this with Barry M Dazzle dust in Kingfisher, blending slightly onto the purple so that it created a fading/ombre effect. I then dusted a gold pigment - Collection Dazzle me dust in Bedazzle onto my cheekbones, the middle of my forehead and dusted any excess gold over the whole scales.

The thinner the fishnets, the more it blends into the skin and looks more realistic, in my previous attempt I used a thicker material fishnets, which gave a bolder look which still looked effective but less skin-like and realistic.

To finish the look I ran the purple pigment under my jaw and blended a mixture of the colours down my neck and onto my chest, adding more scales on the body and giving a blueish green aquatic effect to the skin. I also sprayed blue chalk spray through the ends of my hair and added Barry M Dazzle dust in iridescent (I can't find this online but Illamasqua Static is similar) on the top of my cheeks and under my brow bone.

What do you think of this halloween mermaid look?

Monday, October 27, 2014

HALLOWEEK DAY #1 - THE LEAD UP TO HALLOWEEN

halloween-makeup
halloween-nails

It's cold and blustery outside and so I'm spending the evening inside with fairylights twinkling and candles burning whilst decorating my home with pumpkins and spooky things ready for halloween. I've started to add little halloween touches to my style and make up for this week which is getting me so excited for halloween!

For my nails, I painted them with two coats of Barry M Nail paint in matte black which gives a great, spooky and almost leather looking effect to the nails. On my ring finger I applied a  coat of Essie Vanity Fairest before painting a little black cat face with Orly rage rose gold features and a red heart nose with Nails Inc St James.

On my feet I'm planning to wear my Zara embellished flats with a dark purple slouchy top and my topshop black leigh jeans for subtle halloween style. They have such a cute little face and seem perfect for halloween.

To add a vampy halloween hint to my make up, I've pulled out some purple eyeshadows to smudge under my lower lash line. My favourite is MAC nocturnelle which I wore a lot last year with spidery lashes (See the look here). For something a bit more subtle then MAC Quarry eyehadow is a pretty muted plum brown or for something really bold then MUA purple eyeshadow is a bright electric purple.

What do you think of these little halloween touches?

Friday, October 24, 2014

5 Fandom Friday: My Must See List of Halloween TV


I recently came across The Nerdy Girlie's 5 Fandom Friday link up and couldn't wait to jump in on the action so BOOM here I am! This week's topic: My Must See List of Halloween Movies. Of course, my family and I are more TV-oriented people, so instead of movies, I'm going to be listing my Top 5 Must See Halloween TV Episodes! Here we go!

1. Buffy the Vampire Slayer "Halloween" and "Fear Itself"
While I'm a little more biased towards "Halloween" (and most of Season 2 in general), both episodes deserve recognition as the epitome of a Halloween episode done right!

2. Community "Epidemiology"
They had me within the first 10 seconds with George Takei and ABBA. Before the opening theme even played, I knew this was going to be pure genius - and it was.

3. Angel "Life of the Party"
An overall hilarious episode that I only wish Cordy was still around for - my favorite shenanigan? Hands down, drunk Fred and Wes. Too cute.

4. How I Met Your Mother "Slutty Pumpkin"
Such an iconic episode for the series. 

5. Friends "The One With the Halloween Party"
Because my family has to watch a Friends episode for every special occasion. Plus, Joey dressed as Chandler, Chandler in a pink bunny costume, and Ross as "Spud-nik."

Honorable Mention: Supernatural "It's the Great Pumpkin, Sam Winchester"

Now I really want to go and watch all of these...xD 

What's on your Halloween Must Watch List?

    Monday, November 11, 2013

    Autumn Make up


    I've been wearing this look all throughout September and October and only now am I finally starting to change up my make up! As Halloween, Bonfire night and my Birthday have now all passed, I'm getting pretty excited for Christmas! As I've loved wearing this Make up so much I thought I would share what I've been loving and constantly wearing.


    Eyes - Eyeshadow - MAC Naked lunch all over eye, Mac Satin Taupe in crease and Mac Nocturnelle blended under the eye.
            - Loreal Superliner in Black Vinyl
            - Fashionista white eyeliner
            - Revlon Lash Potion Mascara


    Nails - My Halloween nails

    Sunday, October 27, 2013

    Halloween Skull / Ghost Nails

    Halloween Nails
    Halloween Skull Nails
    Haloween Nails

    I love this little skull design for some halloween nail art, it's easy to do and looks sweet on the nails! I did my nails like this for the weekend and got so many compliments on it! 


    This is how I achieved the look:

    Step 1 -  Paint the whole nail in the colour of your choice, I chose an oxblood colour but  
                 black or grey would also work well! I used 2 coats of OPI Nail Varnish in Mrs 
                 O'Leary's BBQ.

    Step 2 -  When base has dried, use a dotting tool to make 4-6 large polka dots on each 
                  nail, for this I used Barry M Nail paint in 66 Matt White.

    Step 3 - Using a smaller dotting tool draw either a squiggly ghost tail or a square on the
                 base of the polka dots, again using Barry M Matt White Nail paint.

    Step 4 - Eyes! I used the thinnest dotting tool to dot little eyes on my Skulls using Sinful
                colours in Black on Black.

    Step 5 - Once the eyes are dry, use a Topcoat to set and to give the nails a nice shine. I
                used Sally Hansen Insta-Dry.

    Let me know if you try these!
    xx

    Sunday, October 28, 2012

    Halloween Black Cat nails

    halloween-nails
    halloween-nail-art
    black-nail-designs
    nails

    I love this simple black cat nail design, It's easy to do and looks cute on the nails! For Halloween I'll be wearing black sparkly nail varnish on my nails and then have this little cat design as an accent nail!

    This is how I achieved the look:

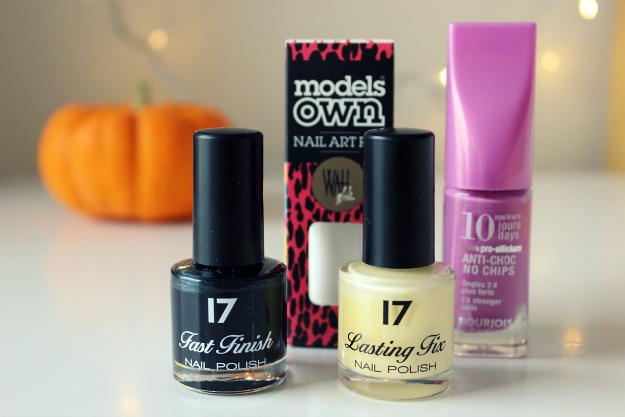
    Step 1 -  Paint the whole nail black and wait to dry, I used 3 coats of 17 Nail Varnish in Nightshade.

    Step 2 -  Using a cuticle stick, paint a pink triangle on the nail using the middle as a
                 guide for the top of the Triangle, but make sure you leave enough room for the  
                 eyes! For this I used Bourjois 26.

    Step 3 - Again using a cuticle stick draw on the eyes, to do this I made a circle shape and 
                then dragged the stick up to create a 'cat eye' effect. I used 17 Nail Varnish in  
                Sherbet Lemon

    Step 4 - Whiskers! I used the thin metal pen end of the models own nail art pen. This has a brush and a pen, I found the brush too difficult to use but the pen was so easy to draw on the nail.

    Step 5 - Once the eyes are dry, use a cuticle stick to draw on the pupils. I used 17 Nail Varnish in Nightshade but a Green Nail varnish would also work really well!

    Let me know if you try these!

    Sunday, May 29, 2011

    I am Mermaid ♥

    halloween-mermaid-makeup
    halloween-mermaid-makeup-tutorial
    mermaid-makeup

    Hello everyone!!

    I hope you are all having a lovely bank holiday weekend. 

    I saw Pirates of the caribbean 4 recently and was soo inspired by the mermaids!! 
    This look isn't like the mermaids in the film, i've just taken inspiration from it.
    To create this look I popped a fishnet stocking over my head and patted on a blue and purple Barry M Dazzle Dust and then lightly brushed gold Barry M Dazzle dust over the top. I carefully lifted the fishnet stocking off and then blended around the outside using a powder brush. I also used the Barry M dazzle dusts on my eyelid. I popped on my tokyo eylure lashes and a clear gloss to complete this look.
    For my hair I added some hair extentions and braided them into a fishtail plait.

    Hope you like :)

    xx